So I'm going to remove the head and do it that way instead of trying the tricky way of keeping the head on. So the tools and such needed.
Valve spring compresser ( I have a couple different sizes but will buy another if neither of these work)
wrachet set and end wrench set for removeal of head (already have)
suran wrap to completely cover and protect engine while head is removed
feeler guages for valve clearance adjustment (.002 and .003)
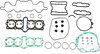
1 - Head gasket (includes oil seals on either end right?)
1 - rocker arm housing gasket/seal
1 - valve cover seal
8 - valve stem seals
8 - valve spring keepers
new spark plugs
acitone for cleaning of gaskets and parts
gasket sealent
Anything else I'll need?
Also, I would like to know of any sources for these parts. I would rather not buy a complete gasket set. I am also a college student so funds are of coarse limited.
Thanks to all.


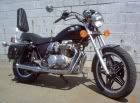
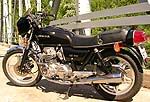
Thats the bike as when I purchased it. I've already bought a nice faring, tool bag, and hard leather saddlebags. Also replaced the hand-grips and foot rest with new. The more chrome, the better.
Frankie


